Protocols
Protocols define a data schema and the contract by which two Decentralized Web Nodes (DWNs) agree to communicate and share data. In other words, protocols define both the data schema and the data permissions as it relates to a certain application or use case.
Protocols are written in a JSON format that is flexible enough to detail what objects are stored as part of the application, as well as who has what permissions on those objects. Although schema and permissions are traditionally decoupled in Web2 development, protocol documents serve as a robust and concise way to define how your application handles data.
Protocol Basics
Every protocol document has a few basic keys:
types- Defines all the elements used in your protocolstructure- Outlines the relationship and interaction rules between different types$actions- Specifies a set of permissions outlining who is allowed to perform specific actions like reading or writing on a given type
These terms are combined in a human-readable way to define both the data schema and permissions of your app.
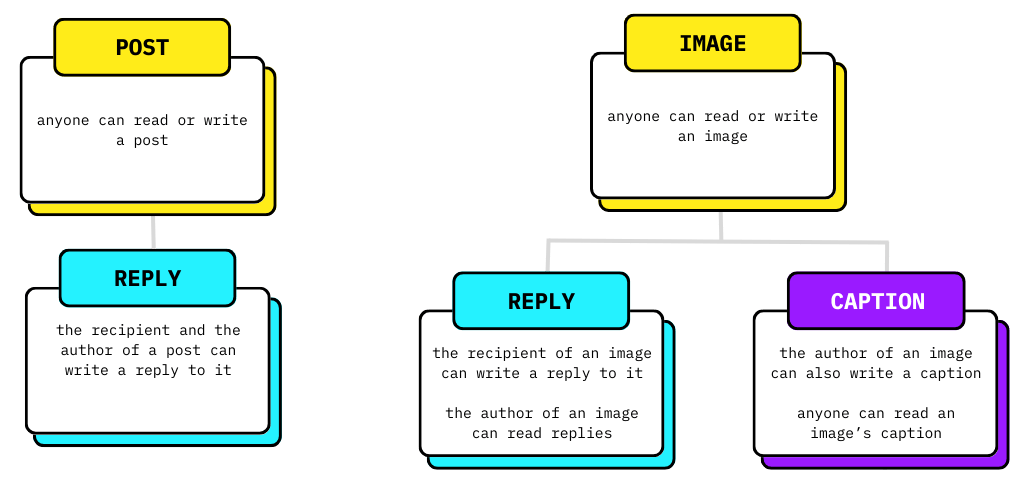
To apply these concepts, let's consider if we wanted to build a basic social networking application. In our social network, we want users to be able to add posts and replies, as well as images with captions that can be replied to. This application has a data design of two key objects: posts and images. Images have caption and reply properties, while posts just have a replies property.
Now let’s imagine how we’d construct the permissions for such an app. We want all users to be able to add images and posts, but we have a few constraints on the other properties:
- Only the author should be able to add an image caption
- Only the recipient(s) or the author of a post should be able to reply to it
- Only the recipient(s) of an image should be able to reply to it
Defining a Protocol
We know the key words for defining protocols - types, structure, and actions - as well as our data and permissions schemas. So our protocol would look this:
const protocolDefinition = {
    "protocol": "https://social-media.xyz",
    "published": true,
    "types": {
      "post": {
        "schema": "https://social-media.xyz/schemas/postSchema",
        "dataFormats": ["text/plain"]
      },
      "reply": {
        "schema": "https://social-media.xyz/schemas/replySchema",
        "dataFormats": ["text/plain"]
      },
      "image": {
        "dataFormats": ["image/jpeg"]
      },
      "caption": {
        "schema": "https://social-media.xyz/schemas/captionSchema",
        "dataFormats": ["text/plain"]
      }
    },
    "structure": {
      "post": {
        "$actions": [
          {
            "who": "anyone",
            "can": ["create", "read"]
          }
        ],
        "reply": {
          "$actions": [
            {
              "who": "recipient",
              "of": "post",
              "can": ["create"]
            },
            {
              "who": "author",
              "of": "post",
              "can": ["create"]
            }
          ]
        }
      },
      "image": {
        "$actions": [
          {
            "who": "anyone",
            "can": ["create", "read"]
          }
        ],
        "caption": {
          "$actions": [
            {
              "who": "anyone",
              "can": ["read"]
            },
            {
              "who": "author",
              "of": "image",
              "can": ["create"]
            }
          ]
        },
        "reply": {
          "$actions": [
            {
              "who": "author",
              "of": "image",
              "can": ["read"]
            },
            {
              "who": "recipient",
              "of": "image",
              "can": ["create"]
            }
          ]
        }
      }
    }
}
The value for protocol is a URI that serves as the key of the protocol being configured. If two or more applications use the same protocol, identified by the URI, users can enjoy common experiences across these apps in a more interoperable way. Ideally, the protocol URI should lead to a JSON Schema document that validates the configurations, however, this URI is not resolved nor are its contents validated by Web5.
The published attribute indicates whether the protocol should be public. Published protocols are accessible by anyone who queries for them.
{
  "protocol": "https://social-media.xyz",
  "published": true,
}
In the types section, we can see how the data schema of each data type is defined. While you’d ideally use a resolvable schema in this property, that is not a requirement.
"types": {
  "post": {
    "schema": "https://social-media.xyz/schemas/postSchema",
    "dataFormats": ["text/plain"]
  },
  "reply": {
    "schema": "https://social-media.xyz/schemas/replySchema",
    "dataFormats": ["text/plain"]
  },
  "image": {
    "dataFormats": ["image/jpeg"]
  },
  "caption": {
    "schema": "https://social-media.xyz/schemas/captionSchema",
    "dataFormats": ["text/plain"]
  }
},
You’ll then notice how each of those types is used in the large structure object, which at a top level houses the post and image data types which are critical to our social network.
"structure": {
  "post": {
    "$actions": [
      {
        "who": "anyone",
        "can": ["create", "read"]
      }
    ],
    "reply": {
      "$actions": [
        {
          "who": "recipient",
          "of": "post",
          "can": ["create"]
        },
        {
            "who": "author",
            "of": "post",
            "can": ["create"]
          }
      ]
    }
  },
  "image": {
    "$actions": [
      {
        "who": "anyone",
        "can": ["read"]
      },
      {
        "who": "anyone",
        "can": ["create"]
      }
    ],
    "caption": {
      "$actions": [
        {
          "who": "anyone",
          "can": ["read"]
        },
        {
          "who": "author",
          "of": "image",
          "can": ["create"]
        }
      ]
    },
    "reply": {
      "$actions": [
        {
          "who": "author",
          "of": "image",
          "can": ["read"]
        },
        {
          "who": "recipient",
          "of": "image",
          "can": ["create"]
        }
      ]
    }
  }
}
Within post, you’ll notice we define actions permissions to let anyone read or create one.
"post": {
    "$actions": [
      {
        "who": "anyone",
        "can": ["create", "read"]
      }
    ],
},
But then we nest another structure object to hold the child property of reply and define permissions on reply.
"post": {
  "$actions": [
      {
        "who": "anyone",
        "can": ["read", "create"]
      }
  ],
  "reply": {
    "$actions": [
      {
        "who": "recipient",
        "of": "post",
        "can": ["create"]
      },
      {
        "who": "author",
        "of": "post",
        "can": ["create"]
      }
    ]
  }
},
Additionally, you’ll notice the image object below it also defines actions permissions, along with more child properties and their permissions.
"image": {
  "$actions": [
    {
      "who": "anyone",
      "can": ["create","read"]
    }
  ],
  "caption": {
    "$actions": [
      {
        "who": "anyone",
        "can": ["read"]
      },
      {
        "who": "author",
        "of": "image",
        "can": ["create"]
      }
    ]
  },
  "reply": {
    "$actions": [
      {
        "who": "author",
        "of": "image",
        "can": ["read"]
      },
      {
        "who": "recipient",
        "of": "image",
        "can": ["create"]
      }
    ]
  }
}
Installing a Protocol
To use a protocol in your app, you’ll need to install that protocol to your DWN. You can do so using the following snippet where protocolDefinition is the messaging protocol object from above:
const { protocol, status } = await web5.dwn.protocols.configure({
    message: {
      definition: protocolDefinition
    }
});

//sends protocol to remote DWNs immediately (vs waiting for sync)
await protocol.send(myDid);
Once you’ve installed that protocol to your DWN, you’re ready to communicate using the schema and permissions it defines.
Protocols in Practice
Building on our social media example, let’s say that you wanted to post a message to your friend Alice. First, ensure that she has also installed the https://social-media.xyz protocol on her DWN. Then, you can write to her DWN via the https://social-media.xyz protocol using:
const { record: postRecord, status: createStatus } = await web5.dwn.records.create({
  data: 'Hey this is my first post!',
  message: {
    recipient: aliceDid,
    schema: 'https://social-media.xyz/schemas/postSchema',
    dataFormat: 'text/plain',
    protocol: protocolDefinition.protocol,
    protocolPath: 'post'
  }
});
Now, let's say Alice wants to reply to the post. Remember, reply is a child of post, therefore this record should reference the post record's id as its parent.
const replyResponse = await web5.dwn.records.create({
    data: "replying to post",
    message: {
      recipient: senderDid,
      protocol: protocolDefinition.protocol,
      protocolPath: 'post/reply',
      parentContextId: postRecord.id,
      schema: "https://social-media.xyz/schemas/replySchema",
      dataFormat: 'text/plain',
    },
})
If an app wants to display all of a post's replies, it can obtain the post's record ID and then query for records that have that id as a parentId.
const { records: replies } = await web5.dwn.records.query({
    message: {
        filter: {
            parentId: postRecord.id
        }
    }
})
And that’s it! Via the social-media protocol, you’ve now written a message to Alice’s DWN and she has replied.
This protocol enables a basic social network using Web5, which means we’ve created a basic trustless, decentralized social network where your users host all of their own data.
Validating Protocols
As you write your protocol documents, you can use this simple protocol validator UI app to explore and validate the types and structures in your protocol. This should help with testing and improving your protocol. Find out more about how to use this project on GitHub.
Example Protocols
Here are a bunch of example protocols for more inspiration!
Video Tutorials
Was this page helpful?
Connect with us on Discord
Submit feedback: Open a GitHub issue
Edit this page: GitHub Repo
Contribute: Contributing Guide